2013-12-30

C++ Hello World Using clang_complete and Vim

Many posts on the advantages of clang_complete have already been posted. For example, there's a demonstration of the plugin on Mac. If you can understand Chinese (or you have a translator that truly understands it), you may even look at more sites, such as Chen's post.
The authors of the above posts are likely to work in the IT sector. For new comers of programming, they may like to start from zero. On which platform can they start from? I'd recommend popular *nix distributions (e.g. Debian-based/Fedora-based ones) due to their package managing tools like APT or YUM. For a M$ Vis* Stu* like code completion on Vim, clang_complete is the right answer, but it is often hard to install on M$ Win* [1], but the installation is incredibly easy on *nix. [2]
Many writers of posts on clang_complete installation stopped writing further after completing the whole installation and configuration of the plugin, and I haven't seen any post that uses "hello world" as an example. This is alright since many users of Vim are experienced programmers who would like to demonstrate some advanced features of the editor with the additional plugin (e.g. jumping between ctags), and a simple hello.cpp can't be used for that. Moreover, many teachers would teach programming on M$ Win*, and even if a *nix desktop is used, the work is most likely done using an IDE on GUI (Emacs is a text editor and IDE that runs on command line.) ... The concept of modal editing may be too hard for newbies to accept it, and you need to get several commands right before entering any text into a buffer. The steep learning curve might frighten learners away from Vim... Some computer users believe in the myth that Vim and Emacs are too old and nobody use them.
Anyways, the mixed use of both the built-in omni-complete function of Vim (invoked by <C-n> or <C-p>) and the popup menu of clang_complete (invoked by <C-x><C-u>)to write a "hello world" program is a productive way of doing the job. However, due to the limitations of human mind, we can remember very few unfamiliar things at a time. This is not the case in storage devices. They can capture every word that come out of our mind, though many physical means of storage of imformation are subject to aging, especially those in the past... Luckily, information technology allows words, and even fonts, to be replicated efficiently and almost identically. This has brought the human race a variety of new subjects, such as web *ng, and has extended our old knowledge into many fields, such as typography... In addition, the advancement of technology enables us to capture visible images and copy it rapidly, and I've recorded my experience of "hello world" using clang_complete with Vim on a series of screenshots.
In addition to adding Wu's custom vimrc configuration for clang_complete [3], I've also installed vim-snipmate and vim-snippets for more auto-complete mappings.
Before actually beginning the steps for writing a "hello world", we should know that we won't learn anything from successes. It's failures that help us reflect on the mistakes in our understand of theories. Therefore, I'll deliberately find something wrong, and elaborate on that using some ideas. In other words, that's "to blow water" in Cantonese.

1. Comparison between clang_complete and the editor's built-in completion in typing #include<iostream>

1.1 The editor's built-in completion

The following "hello world" procedure contains some wrong steps.


  1. Type inc<Tab>.
  2. Vim-snippet completes the code, with stdio.h as default. The file name of the included file is selected so that you can input something else.
  3. Since cout is used later, we need to #include<iostream>. First type io to override the default input.
  4. Type <C-n> or <C-p> to get a completion list.
  5. Select iostream (without 's').
  6. Continue typing the whole program, and compile it.
  7. The source code fails!
Obviously, there's a syntax error at the line #include<iostream.h>. Thinking about the auto-completion function again, one will notice that the correct step is to press <Esc> after step 1, and use ci< to clear the code inside the <> block, that's a good try, but I personally think that the steps can be more beautiful.

1.2 clang_complete's solution

This is just a part of correct steps. I leave the remaining parts of codes of this simple program into later sections.


This time, after typing # at the beginning of the line, press <C-x><C-u> to use the automatic completion list, and choose the # include option with the $`header' surrounded by a <> block, not a double quote. Use <Alt-Tab> to select the inner <> block and type io<C-n> to use the built-in (not plugin) function to complete the code. (The <Alt-Tab> keystroke doesn't work in GUI, since it means changing the window on focus.)
Note: In this method, stdio.h needs to be included. Otherwise, the built-in insert completion popup menu containing iostream will not be shown.

2. Completion of using namespace std;

  1. Without clang_complete: Directly type in everything, or use <C-n> for word-by-word completion.
  2. With clang_complete:  The completion menu can complete the whole line.
Analysis: Finding an item from a menu requires coordination of our eyes and hands, while typing the code directly requires more memory. For a newbie, the former should be easier since he/she doesn't waste time to recall his/her memory. For a geek, the later should be faster since the process has been repeated for many time. Luckily, being the second in the popup list, the problem of reaction time does not matter much if one looks at the list from the top to the bottom. Moreover, typing the code directly may lead to syntax errors. This problem can be overcome if one has the capability to read the error message from the compiler and to browse code quickly.

Without clang_complete: word-by-word completion
With clang_complete: completion of the whole line

The remaining parts of this post doesn't make use of the clang_complete plugin.

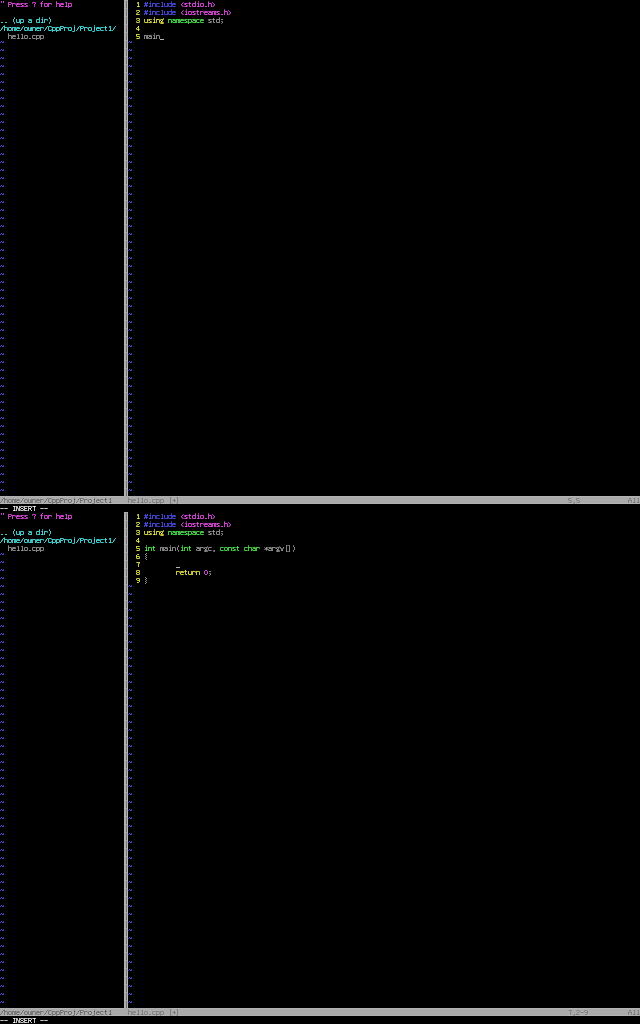
3. The main method

Just typing main<Tab> will do. That's from vim-snippets.

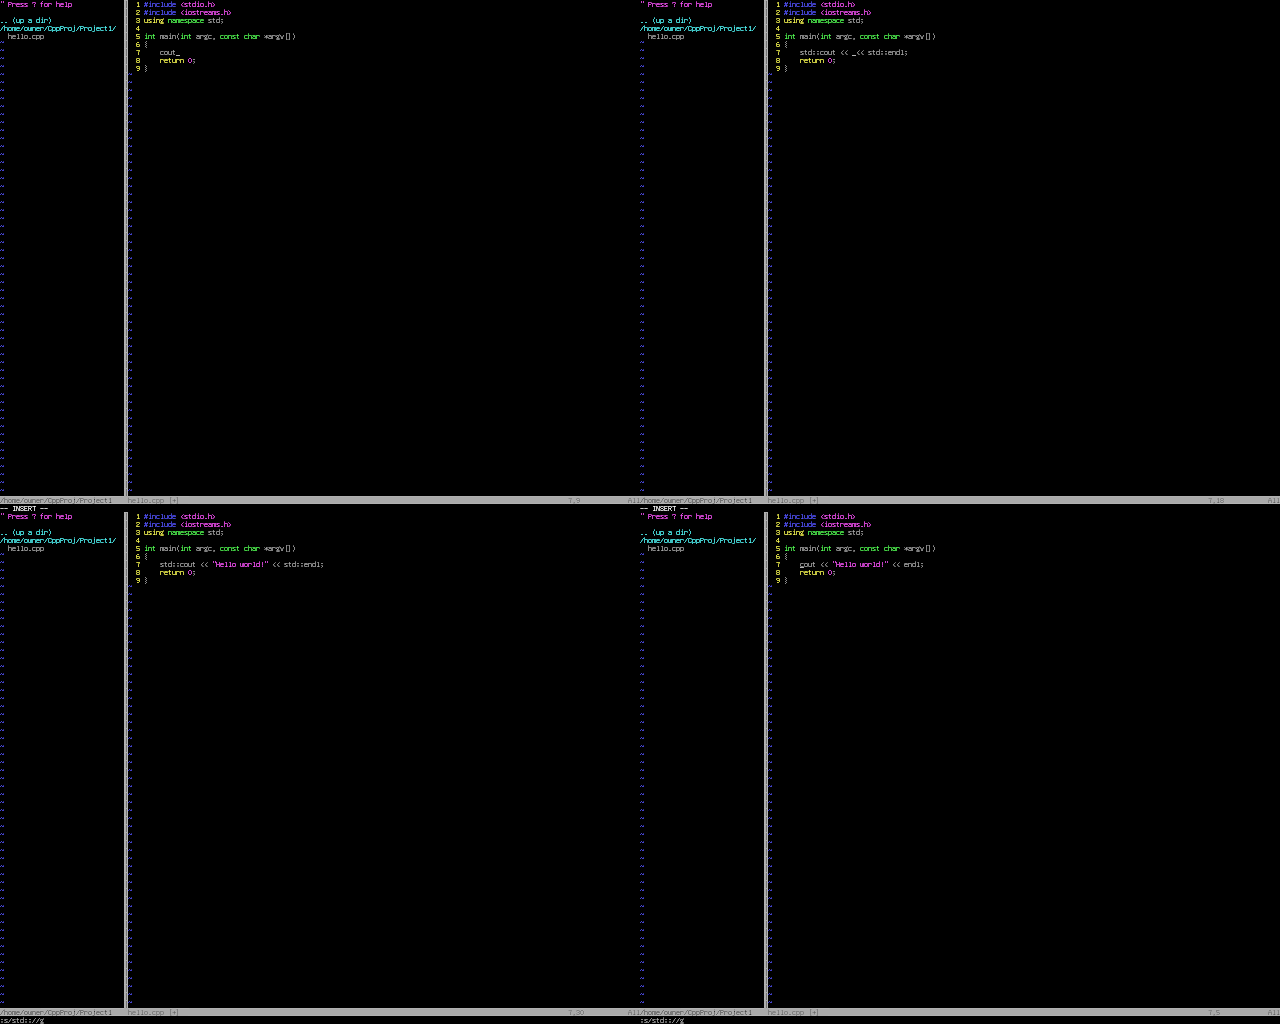
4. Greeting the world!

If you type cout<Tab>, you'll get std::cout<< <<std::endl;, with the cursor located in between the two whitespace characters in the middle. Using a regular expression to delete the std:: in front of cout and endl.

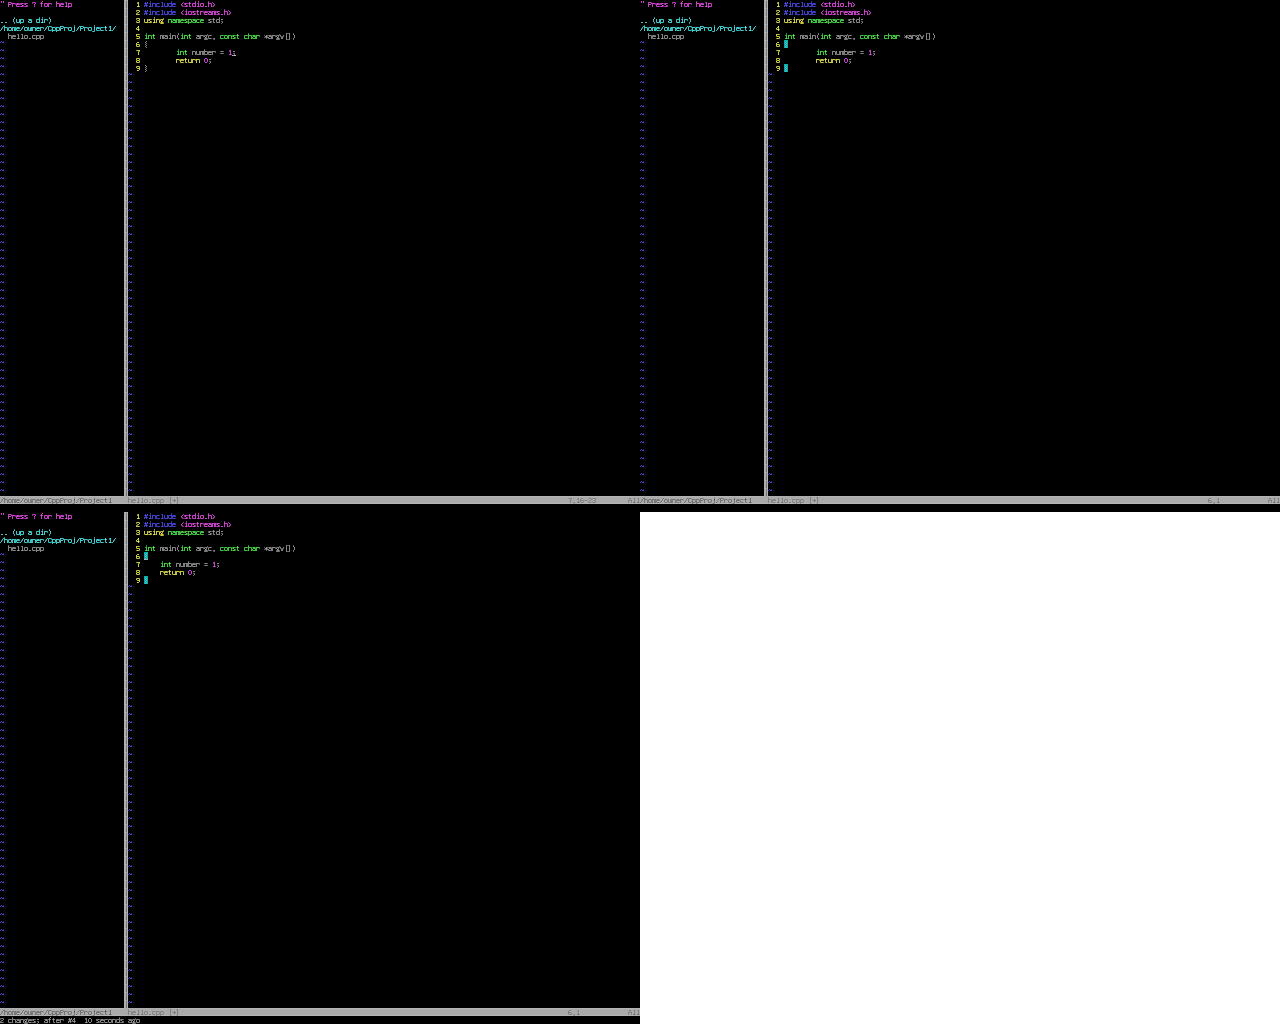
5. Getting the indentation correct

Modifying the c.snippet file maybe a bit troublesome, and may bring strange consequences to the plugin. If you don't have time to study the plugin, you may not like to bother it. Manually decreasing the indentation of the line return 0; each time is not likely to be an elegant solution for Vim Lovers. The actual way to fix the problem (using the command gg=G in the normal mode) is on p. 73 of the book Vi iMproved—Vim. [4]

6. Running the program

For some newbies, it might be too much for them to digest if I discuss more on the creation of a sample makefile, which automatically executes more complicated compiling commands with a simple make command, searching "makefile tutorial" on the web will do. If you don't like the clang compiler, just substitute clang++ with g++.
According to Henri Poincaré, a French mathematician, things are beautiful if they are simple. Repetition of facts build up our understanding. I end this post with a short and simple command that can be repeatedly used to compile .cpp source files with different file names. For more details about that, refer to my earlier post titled Fast Compilation and Execution of Source Code.


Reference:
[1]: http://blog.chinaunix.net/uid-53564-id-3558537.html
[2]: http://changyy.pixnet.net/blog/post/31706673-%5Bvim%5D-using-clang_complete-plugin-@-ubuntu-12.04
[3]: http://blog.wuwon.id.au/2011/10/vim-plugin-for-navigating-c-with.html
[4]: ftp://ftp.vim.org/pub/vim/doc/book/vimbook-OPL.pdf

2013-12-29

Don't Kill a Fly with a Cannon—Console Creation of GIF Files

As the saying goes, a picture is worth a thousand words. Some netizens believe that if a picture tells the truth.
If you want to take a screenshot in Linux text mode, you may use fbgrab to get a PNG file (fbcat gives you a PPM file).
If you want to illustrate a process with a series of pictures, then you'll probably need a GIF file. GIMP provides an easy way of creating GIF files by selecting menu items and clicking a few buttons, but for geeks who are used to command line interfaces (CLI), this is not the final answer for them.
With reference to Unix & Linux Stack Exchange question 24014, if your source PNG files are named as [name]%s.png, then the right command is:
$ convert $(for ((a=0; a<700; a++)); do printf -- "-delay 10 [name]%s.png " $a; done;) [result].gif
# `-delay 10' means that each image is displayed for 0.1s.
# [name]: file name of the source PNG files without the ordinal number.
# `%s': the n-th PNG file.
# [result]: file name of the target GIF file.
Without the whitespace between png and the ending ", things won't work.
If the GIF animation has not been finished and intermediate files need to be saved, don't use the .gif format, use .miff instead. [1]

Reference:
[1]: http://www.imagemagick.org/Usage/anim_basics/#gif_anim

2013-12-23

My Experience of Using Vim.js

To use Vim in other computers, the official website of PortableApps has already provided users a satisfactory solution. The installation size is about 28 MB (according to the released figure). If you won't have it installed in a portable device and don't want to download and install it into a new machine each time, maybe you can try Vim.js. However, I've found it slow, when compared to a Vim program.

Vi Key Bindings in Emacs

From Wikipedia's post on the Editor's War, we can see some nicknames of GNU Emacs, such as "EMACS Makes All Computers Slow", "Esc Meta Alt Ctrl Shift", etc. I found the second one true. I tried using Viper, but it's inconvenient to browse info files since the C-] button doesn't work. As a result, I need to toggle Viper using C-z all the time. Nevertheless, it's too inconvenient. Maybe that's because of my low level of Viper set (level 1), and there are other plug-ins that enables users to use Vi(m)'s key bindings in Emacs, but I'm tired of this sort of tedious work.
After overcoming a steep slope in the very first part of the learning curve of a powerful tool, maybe you'll find out that there's some other more productive tool for doing the job. That's not something new and that's the reason for so many different tools to come up. For example, Vim is originally intended to be part of the shell, and you've spent hours to get a Vim plug-in for GDB integration (e.g. pyclewn). Finally you found out that you forgot that both Emacs and GDB are developed by GNU, and they are the early famous softwares from GNU, so they should work well together. Otherwise, how can GNU encourage users to use free softwares? Therefore, it's sensible to expect that Emacs has a built-in support for GDB (and it does!).
Hence, the best way is to be flexible and use suitable tools to do different jobs.
After realising the use of both of the two most famous text editors for *nix users, it's important for us to get use to them. As a Vim user, reading the official Emacs tutorial available on the homepage of Emacs, I've found out that it's too long if what I need is to do some basic editing work. Some introductory web pages on elementary Emacs commands from some tertiary educational institutions can help some newbies of Emacs, but if you can link up new knowledge with any previously known ideas, it'll be even better to refer to this post.

2013-12-13

Writing Vim's Output to Files

Changing environment variables in vimrc

Refer to Vim Wiki's page on environment variables.
The tips uses paths in *nix in the examples. However, for Win*, some inexperienced users don't know whether slashes or backslashes should be used. In fact, backslashes should be used, and the string should be enclosed by a pair of single quote (I don't know if double quotes work.)
Then things should run. If you're unlucky and receive a runtime error in the next time you start Vim, then it may be due to the missing space characters around the equal sign.

Writing external commands to files

It's easy! (:r ![command] will do.)

Writing variables to files

Use the = register. First get into normal mode.
"=
[sth_to_eval]<CR>
p
The p have to be typed before any further changes of contents. Otherwise, it may not work.
For details, see Unix & Linux Stack Exchange question 8101.

Writing internal commands to files

A forum post has answered my doubt. I redirect interested readers to here.

Quick reference lists of some easy Vim commands

There's "100 Vim commands every programmers should know".
Another page: 130+ Essential Vim Commands

2013-12-12

OmniCppComplete Installation for Dummies

Note: In Stack Overflow question 12339415, it is suggested that clang is better. For its installation, refer to its another fan's blog.
Background: OmniCppComplete is a great Vim plugin that has the popup menu like many big IDEs. A Youtube video can show the power of OmniCppComplete.
Download: OmniCppComplete requires ctags.
  1. OmniCppComplete: GitHub Repository (To avoid mixing up of files from different plugins, use one plugin management plugin like Pathogen or Vundle.)
  2. Ctags: Official homepage on SourceForge (The .zip file for Win* 2**0 is fine.)
For more detailed information on the installation of ctags, please refer to my earlier blog post Links to Good Posts.
Problem: Reading the OmniCppComplete's documentation only, you won't be able to understand how to use this plugin, so follow some tutorials, and the most viewed one should be on Vim Tips Wiki. Followed its guidance, I got error in typing std:: in a new .cpp file. Omni completion told me something like "pattern not match". I spent nearly 2 hours to figure out what's wrong, and finally managed to fully understand the contents of this blog entry.
Now, I'm going to make a Win* version of Vim Tips Wiki's tutorial, using the ideas from Carl.
Solution:
  1. I suppose OmniCppComplete and ctags are installed properly.
    • OmniCppComplete does not mix up with other plugins.
      Note: For gVimPortable, do store files under the Data folder, but NOT the $VIMRUNTIME file. Otherwise the settings will be lost after upgrading gVimPortable.
    • The folder for different plugins are separated (except the plugin management plugin itself).
    • Typing :h omnicppcomplete in Vim normal mode gives up the help file for OmniCppComplete.
    • Typing :h omnicppcomplete gives you the corresponding help file.
    • The folder for ctags is in the PATH environment variable.
      Follow this page for setting the PATH variable.
      C:\ctags58 should be in the PATH variable.
  2. Download the modified libstdc++ headers from GitHub.
  3. Unzip the folder and place it under "somewhere meaningful to you"
    My suggestion: C:\Users\[your-user-name]\.vim
    Here you can substitute [your user name] with your real user name on Win*.
    Note: In the dialogue (in case you use GUI), DON'T input tags at the end. Otherwise, you'll get C:\Users\[your-user-name]\.vim\tags\tags
  4. If things go right, you should have C:\Users\[your-user-name]\.vim\tags
    Go to that directory by typing cd .vim\tags in Win*'s Command Prompt, which can be involked by typing cmd in the "Start" menu. (For XP, choose "Run" and type "cmd" in the popup dialogue. If you like choosing from the menu, follow the way on the official website.)
    At first, a commad prompt should be like this.
    The current directory is C:\Users\Owner.
    Change the current directory to C:\Users\Owner\.vim\tags.
    The contents should be shown by typing dir (There're so many files that I use the /w option to save space.)
  5. The contents are in the right place, so we may proceed.
    Get a list of ctags.
    To get a list of ctags, the correct command:
    >ctags -R --sort=1 --c++-kinds=+p --fields=+iaS --extra=+q --language-force=C++ -f cpp .
    The one you see on Vim Tips Wiki:
    >ctags -R --sort=1 --c++-kinds=+p --fields=+iaS --extra=+q --language-force=C++ -f cpp cpp_src
  6. Then you should have a huge list of ctags with the file name cpp. Not adding the additional tags for OpenGL, etc, is OK.
  7. Finally, adding the lines found in the Vim Tips Wiki into your vimrc will do.
    Note: If you don't add the additional tags in step 5, then the following lines should NOT be added.
    set tags+=~/.vim/tags/gl
    set tags+=~/.vim/tags/sdl
    set tags+=~/.vim/tags/qt4

Testing

A picture can illustrate the feature well. Typing std::, you'll get a popup list.

Incompatibility with clang_complete

Note that Omnicppcomplete is incompatible with another Vim plugin called clang_complete, due to its "unconditional popup of completion list". To understand this, the following pictures give a good interpretation.

In Omnicppcomplete, after typing std::, the completion list will pop up.
However, in clang_complete, since the information is from the clang compiler, you need to give the syntax in the right position for the compiler so as to let the completion list to show up.

Missing #include<iostream>
Still wrong position of the input
Right position
In Ubuntu, it's easy to install. Note that you need clang-dev as well. For Win*, maybe you need to download the source. (I hope there will be a compiled version of the compiler.)

Reference:
[1]: http://hi.baidu.com/dt_zhangwei/item/277572044909fc103a53eea5

2013-12-11

Choosing a Font for Vim

Unclear difference in appearance between 1 with l, 0 with O can be a source of inconvenience for computer users. This summer, I've found this site informative, but I quickly forgot it.
Installation of many fonts in some popular Linux distributions can be done in GUI just like Win*, so I attempted to change my default font on Vim, and a picture is worth a thousand words.
The following command from Vim Tips Wikia will do: :set guifont=[font-name]:h[font-size]. (Escape the whitespace character with a backslash, i.e. use \ to represent a whitespace.)

gVim with Inconsolata 12pt

Links to Good Posts

Taglist installation

Taglist is a popular Vim plugin and it requires ctags. c9s has given a detailed description of the installation of ctags. I've found out that putting the whole ctags58 folder under the C drive and adding it to the PATH environment variable will do. You don't need to copy ctags.exe under the C drive or $VIMRUNTIME.
TheGeekStuff has a web page which described numerous powerful functions of Taglist.

Some vimrc settings

I've learnt something about vim keyboard mappings by reading a post on customized vimrc settings.Using this knowledge, I can do something that I couldn't do last month.

Automatic completion of unclosed braces/brackets

Unmatched brackets/braces are the cause of a host of syntax errors in source code. Some novices probably spend hours to find it out, and then say something that their high school teachers will never approve. a Vim Tips contains a simple solution that enable users to get the job done. However, I'm not accustomed to its differences with Vim-$\rm \LaTeX$, so I decided to add the following lines of code into my .vimrc file:
inoremap (      ()<++><Left><Left><Left><Left><Left>
inoremap (<CR>  (<CR>)<Esc>O
inoremap ((     (
inoremap ()     ()<++><Left><Left><Left><Left><Left>
inoremap [      []<++><Left><Left><Left><Left><Left>
inoremap [<CR>  [<CR>]<Esc>O
inoremap [[     [
inoremap []     []<++><Left><Left><Left><Left><Left>
inoremap {      {}<++><Left><Left><Left><Left><Left>
inoremap {<CR>  {<CR>}<Esc>O
inoremap {{     {
inoremap {}     {}<++><Left><Left><Left><Left><Left>
After the user types <C-j>, the cursor will jump to the position of the placeholder <++> and the whole placeholder will disappear, just like Latex-Suite.

New keyboard shortcuts of my gVim

Finally, I decided to use <F3> and <F12> in normal mode for toggling NERDTree and Taglist respectively.
nnoremap <F3> :NERDTreeToggle<CR>
nnoremap <F12> :TlistToggle<CR>

Vim File Name Modifier

Typing :h %:p will give you a list of file name modifiers in cmdline.txt, and the section below filename-modifiers is extension-removal. The list maybe too detailed, especially for users who don't have much time to learn it. Bram Moolenaar, the father of Vim once said that trying to learn all the things in his lecture called 7 Habits of Effective Text Editing (see habit 7). (The video is on Youtube.) Fortunately, there're some examples below the list. I found some useful in the following cases.

Case 1: Executing compiled programs

See my another blog post on programming with Vim for details.!

Case 2: Finding old files

  1. Type :old for a list of recently opened files (some may not appear)
  2. If you can find a right file, note its corresponding line number on the list and type :e #<[num] to open the file.

Case 3: Searching contents of The User Manual

In the very first section of the user manual, it's said that users should read the user manual "from the beginning to the end like a book". However, you sometimes don't have much time to do so and you need to quickly perform some tasks not covered in the sections of the user manual that you've read, such as compiling programs. Using the command :![compiler] [src-file] ... and :![command-to-run-prog] is already good since you don't have to leaving Vim, but you may want to see if Vim has some special features. Searching something like "vim c programming" probably gives users links to an array of GitHub repositories for Vim plugins. Even though you have Pathogen or Vundle, if things are in conflict with each other, you need a lot of time to figure out the culprits and fix the problem. If there's already something written on the official manual, why don't read them first?
The official manual has 2 parts, namely the user manual and the reference manual. For the former, the contents are easier to learn, but the parts are often hard to locate with :h howto and search commands. For the latter, it's easier to locate with :h [sth] since you can pass the [command] that you don't know to [sth] before reaching a relevant section that is too hard for you to keep reading. Therefore, searching contents in the user manual is needed.
Then you have to extract the path of the documentation files, which in under some folders that you don't know. Searching it with a file browser will certainly be ineffective, which using searching commands in the terminal needs time and may not guarantee a success due to the possibility of making syntax errors. A more efficient approach is, assuming that the reference manual is near to the user manual, to first open only page in the reference manual in order to make use of % in Vim commands for the extraction of the path of the user manual. Of course you need to check the actual contents inside the directory. (I have NERDTree installed so I use :NERDTree % for a popup file tree and cd for a change of current directory.)
Thus, with some knowledge in the reference manual (I learn this from :h %:p.), one will find out that the modifier needed is :h. In *nix, the command grep can find contents in a file; in Win*, I'm too lazy to something new so I use something like Cygwin for grep.

Case 4: More about extraction of path of the current file

In the previous case, % and its modifiers enables you to refer to the path of the file, but you don't see its full path. In order to do so, type :echo expand("%").

Conclusion: Stop repeatedly typing the same long thing

Leave machines to machines since they can efficiently replicate long things. That's another tip from Bram Moolenaar (Tip 2).

Something about Win* batch files

Get drive letter

If you run portable devices from a USB stick, sometimes you need to refer to other files that is in the same USB drive. Their relative position is stable, but the drive letter is not. Thus, referring to those files by absolute path doesn't work, unless you do the tedious modifications every time.
Method 1: set var=%cd:~0,3%
Method 2: set var=%~d0 (preferred) Use variable: %var%

Alias on Win*

If you're familiar with *nix and use M$-DOS, you may unconsciously type the ls command in DOS; or if you have a portable version of a software and you need to launch it by command, you will discover the difference between the name of the programs---one has portable at the end while the other one doesn't.
Copy and paste the following lines of code into any text editor.
@ECHO OFF
[command] %*
Save the whole file as [alias].bat and put the file under any folder found on PATH environment variable.
Run [alias] in the command prompt to see the effect.
Note: %* in Win* is the same as $* in *nix. [1]

Reference:
[1]: How can I output all of a batch file's arguments?

Using Vim Keystrokes in Web Browser

Vim fans will be delighted and amazed for knowing this the first time: Vimperator is the plugin for Vim-like behaviour on Firefox. It's the original one and it focuses on usability. Following the hints with f is great! Here're some useful keystrokes:
  • To open a link in a new tab, type F and follow the hints
  • To move the [num]-th tab, type [num]gt (applicable to Vim also)
  • To go to another page, type o
  • To go to another page with similar URL, type O
  • To open another tab, type t
  • To open another tab with similar URL, type T
  • To open another window, type w
  • To open another window with similar URL, type W
  • To copy the URL of the current page (including "#*"), type y
  • To copy the URL of the targeted link, type ;y
  • To copy the current selection, type Y
  • To copy the labeling text of a link, type ;Y
  • To disable Vimperator for one instance, type i
  • To toogle Vimperator, type <S-Esc>
  • To move the last edited text field, type gi
  • To open Vim for editing input in a textfield/textarea, type <C-i> in insert mode
  • To exit the insert mode of a textfield/textarea, the key is the same as the one you use for Vim.
  • To enter the insert mode of a textfield/textarea from the normal mode, either follow the suitable hint or use c to re-enter there (may fail and enter into the caret mode).
  • To search the history, type :hist [anything]
  • In a pop-up browsing history list, press <CR> and ;o to follow a hint. You can type more to filter the suitable one. Typing a capital O instead of a small letter o gives you :open [wanted_link]
More keystrokes from here, and a cheat sheet there.

Another useful plugin

Google/Yandex search link fix enables true copying of the link's URL in Google's search results.

Fast Compilation and Execution of Source Code

Possible software: Vim.

Why?

In a heavy IDE, you need to click a button or some keyboard shortcuts. Unless you frequently use the keystrokes, you'll likely forget them since they are usually non-transferable IT skills.
It's different in Vim. Since it's an F/OSS programmable editor, you can add whatever plugins and extra functions you like. You can adjust you .vimrc file so that the editing environment won't have too many undesirable changes.
Vim is lightweight. If your computer collapses (or even gives you the notorious BoD before RiP) due to loading IDE, Vim is your choice since it may still work with some good design and functions.
What are the good things?
  1. Diminished role of mouse and more use of keyboard due to modes
  2. Syntax highlighting and file type detection
  3. and more from my previous blog post

How? (Doesn't need c.vim)

  1. Set up makefile (simple tutorial about makefile)
  2. Run :make
  3. Run :!./%< on *nix (or simply :!%< on M$ Win*) [1]
Notes:
  1. set makeprg=mingw32-make in vimrc for MinGW make (more details about makeprg)
  2. % stands for the current file, and < stands for the file name without extension.
Advantages:
  • In the whole process, you don't have to leave Vim and keyboard.
  • The commands are the same whatever your files are (already determined by makefile), so you don't waste time to think and type in the correct name.
2 quotes from Sharpe (I don't remember the exact wordings):
"The battle is not in the hands of who give the most shots. It should be those who shot the best."
"A good soldier can fire 3-4 rounds a minute."
My sample makefile:
hello : hello.c
    gcc -o hello hello.c
clean:
    rm -f hello
Note: Insert tabs for indentation, not whitespaces.
If the compiled program is hello.exe, perhaps the extension name is also needed for rm. (I have never tested it.)

With c.vim

Follow the menu and you'll be also good.

Reference:
[1]: How do I run a C program from Vim?

Vim-$\rm \LaTeX$'s \lv command with Sumatra PDF

Why do I switch my PDF viewer?

  • Ado* Read* is proprietary. (EULA)
  • Sumatra PDF is free. (GPLv3)
Go for FLOSS! Go for freedom!

Actual process

Original settings for Ado* Read*: let g:Tex_ViewRuleComplete_dvi='C:/.../AcroRd32' in _vimrc (No extension name)
Problem: How to change Vim-$\rm \LaTeX$'s setting of \lv?
Trial 1: Set g:Tex_ViewRuleComplete_dvi='C:/.../SumatraPDF' in _vimrc (No effect)
Trial 2: Set g:Tex_ViewRule_dvi='C:/.../SumatraPDF' and disable g:Tex_ViewRuleComplete_dvi in _vimrc (No effect)
Trial 3: Set g:Tex_ViewRule_pdf='C:/.../SumatraPDF' and keep g:Tex_ViewRuleComplete_dvi='C:/.../AcroRd32' in _vimrc (Ado* Read* launched instead)
...
Trial n: Set g:Tex_ViewRule_pdf='C:/.../SumatraPDF' and disable g:Tex_ViewRuleComplete_dvi='C:/.../AcroRd32' in _vimrc (No effect)
Solution:
  1. Change PATH environment variable. (You can change it for vim runtime and keep the original one in other programs. See my newer post for details.)
  2. Set g:Tex_ViewRule_pdf='SumatraPDF'
  3. Disable g:Tex_ViewRuleComplete_dvi in _vimrc